Hey, i’m Carlos Megia a second year student in Videogame Development and Design degree in CITM (UPC), this is my research of in-game cutscenes manager implementation in C++.
My objective is to create a functional cutscene manager to create simple cutscenes very easy. Enjoy.
What is a Cutscene?
The most obvious definition of a cutscene is a “film in a game”, according to wikipedia, a cutscene or event scene (sometimes in-game cinematic or in-game movie) is a sequence in a video game that is not interactive, breaking up the gameplay.
Cutscenes are often used for conversations between characters, reward the player, introduce new gameplay features or elements, but, ususally, to explain parts of the game story, to let the player connect with the characters, like a movie, where the player can’t interact. But recently, has appeared this new type of cutscenes more interactive, called “quick time events”, where the player has to press specific buttons to continue the scene.
Types of Cutscenes
There are different types of cutscenes, for example:
Pre-rendered cutscenes
Pre-rendered cutscenes are animated and rendered by the game’s developers, and take advantage of the full techniques of CGI, animation or graphics.
Final Fantasy VII Remake
World of Warcraft
Real time cutscenes
Real time cutscenes are rendred on-the-fly using the game engine graphics during gameplay (this technique is also known as Machinima).
Grand Theft Auto 5
Nier: Automata
Live-action cutscenes
Need for Speed
Mixed Media cutscenes
This type of cutscenes uses pre-rendered and real time cutscenes when the developer think is appropiate.
Wing Comander 4
Interactive cutscene
Interactive cutscenes involve the computer taking control of the player character while prompts (such as a sequence of button presses) appear onscreen, requiring the player to follow them in order to continue or succeed at the action. This gameplay mechanic, commonly called quick time events.
God of War
Pros and cons between pre-rendred and real time
All the types of cutscenes uses two systems to render and play them: real time or pre-rendered (like the real time and pre-rendered types).
Real Time
Pros:
- There is no difference between gameplay and cutscene graphics.
- If the game uses cosmetics, they can be seen also in the cutscene.
- It not uses a lot of memory to save (it’s code)
Cons:
- Multiple elements that can affect the cutscene and affect negatively in the performance.
- Limitation in graphics by the game engine.
- Uses CPU and RAM for calculations at the same time the cutscene is playing.
Pre-rendered
Pros:
- No technical limitations, allow to use lots of cinematographic and animation techniques without limits.
Cons:
- If the game have cosmetics it will not show up.
- The size is much more bigger to save in memory.
- Can break the flow of the game because of difference in graphics quality.
Cutscene Editors
Unity: Timeline & Cinemachine
In Unity version 2017.2, it’s implemented the Timeline and Cinemachine which allows to create trailers, cutscenes, in-game sequences and more.
Timeline is a multi-track squencer, similar to a music editor, where the user can add animations, audios, effects and more, to create the cutscenes, in our case.
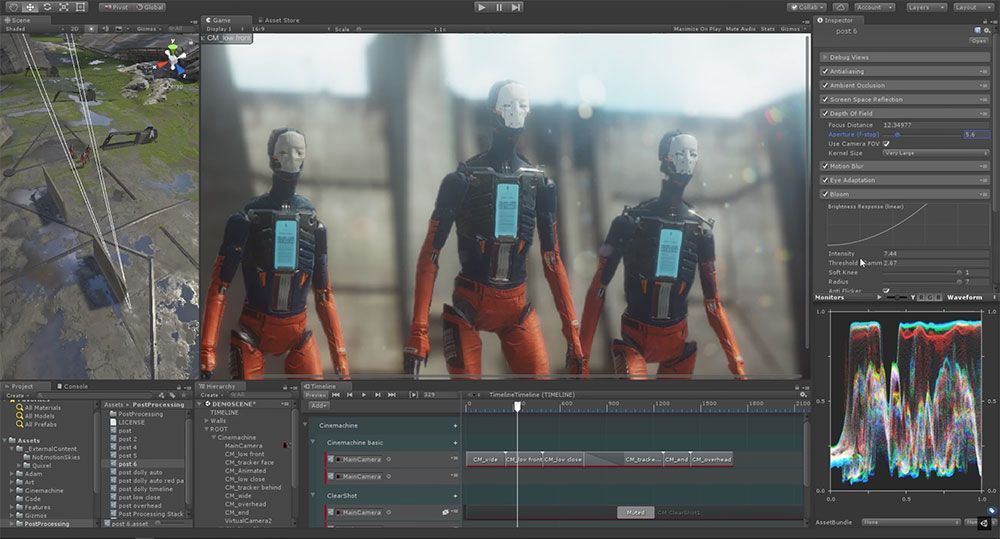
Cinemachine is a smart camera system program integrated in Timeline, which makes it easy and natural to craft shots, build camera rigs, tune and save properties in play mode. It puts industry-leading camera behaviors, and the ability to create with procedural cinematography, in your hands.

Unreal Engine: Matinee & Sequencer
Unreal uses Matinee or Sequencer to create cutscenes.
Matinee is an animation tool that provides the ability to animate the properties of actors over time, to create either dynamic gameplay or cinematic in-game sequences. The system is based on the use of specialized animation tracks in which you can place keyframes to set the values of certain properties of the Actors in the level. The Matinee Editor is similar to the non-linear editors used for video editing, making it familiar to video professionals.

Sequencer, unlike Matinee, is a self-contained assets, and you can embed a Level Sequence within another Level Sequence. For example, you can create a Level Sequence that has animated characters and cameras as one scene that is part of a larger cinematic sequence.

Both of them uses the multi-track sequencer to edit and create the cutscenes.
Code implementation
Our objective is to create a practical and functional cutscene manager to create and manage cutscenes in our projects.
We will create a library which will read the steps and data of a cutscene from a XML file.
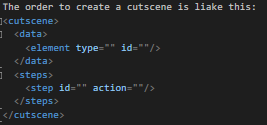
The manager will be able to support audio effects, musics, entities and texts. The structure to save the data from the XML in our code is going to be the following:
Cutscene Manager:
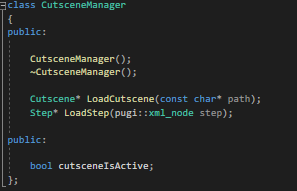
The cutscene manager is not going to be a module, instead it will be a pointer from a global pointer named app to acces to all scenes if necesary. The manager it will be use, only to load the cutscene from the XML and will return a Cutscene* to implement in an instance on the scene. The boolean is going to be use if in other modules or parts of code, outside the code where the Cutscene pointer is, where they don’t have to activate while the cutscene is playing.
Cutscene:
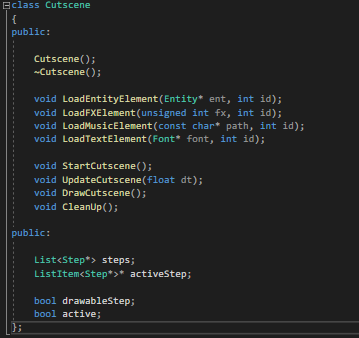
The cutscene is going to have all the steps to follow while playing the cutscene, the step is playing, all the functions to start, update, draw and clean (like a module functionality) the cutscene. Also it will load the elements you want to participate in the cutscene from the code, and implement their data from the code to the cutscene. It also have two boleans, one to see if the cutscene is active, and other when the step requires to render something.
Step:
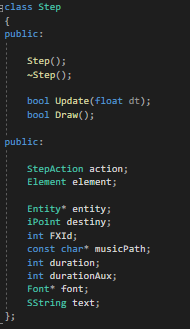
The step it will save what element is going to do the action, what action, and its specific data depending on the type of element is acting. To know save the element data from the xml we will use the class Element:
Element:
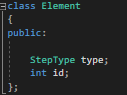
The element will have what type of element is going to act and the identificator.
The type of step and what action is going to do, we have two enums:
Step Type:
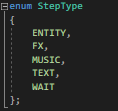
The step type it has what is going to do the action: an entity, fx (audio effect), music, text or wait (which have its own action).
Step Action:
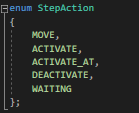
The step action it has what action is going to do the element: move, activate, activate_at (at specific position, X and Y), deactivate ot waiting (unique action from type wait).
Exercise
Let’s start with some coding! To do this exercise you will need to download the release with the handout and solution Here.
TODO 1
Load the from the XML file “cutscene1”. With pugiXML you have to obtain the data from the part data (not steps) and put in an ELEMENT the type and id.
HINT: You will need a list of elements to save the type and id, to then use the id to match the element with the action.
TODO 2
Put the data necessary of the step depending on the action. Continuing with XML, you will have to put the data that needs every step depending on the action that is goint to be done.
HINT: the actions you will find in the enum StepActions, use string above to know the action.
HELP: Not necesary to do for the text, but study how its done.
TODO 3
Discoment the code below. Nothing more.
TODO 4
Load all elements that participates in the cutscene. Use the functions inside the cutscene* variable.
HINT: You will need 4 entities (2 Reds and 2 blue), 2 FX, 2 Musics and 1 Font.
TODO 5
Start, Update and Draw and Clean the cutscene.
EXTRA: In start it only have to activate once, if activates multiple times, it will crash, use for example, GetKey.
EXTRA: In Update and Draw only have to enter when the cutscene is activated.
TODO 6
In extratodo.xml create a new cutscene at your own.
EXTRA: Remember that you will have to redo all the TODO 4 and 5 for the new variables (if there are new).
Bibliography
https://en.wikipedia.org/wiki/Cutscene
https://learn.unity.com/tutorial/timeline#
https://www.gamasutra.com/view/feature/3001/better_game_design_through_.php?print=1
https://docs.unrealengine.com/en-US/AnimatingObjects/Sequencer/Overview/index.html
https://docs.unrealengine.com/en-US/AnimatingObjects/Matinee/index.html
https://learn.unity.com/project/cutscenes-and-trailers-with-timeline-and-cinemachine
https://unity3d.com/how-to/cutscenes-cinematics-with-timeline-and-cinemachine
Important links
Download the release with handout and solution Here.
My github research Here
My Linked In Here
My Twitter Here